fractals in raymarching
dit was een van mijn grootste projecten dit jaar en duurde ook weken.
voor betere computer graphics gebruiken designers raytracing. dit is wanneer je met gebruik van lijnen van lichtbronnen een betere afbeelding krijgt. hierdoor is reflectie en schaduw beter mogelijk. de volgende stap hiervan is raymarching. hierbij kan je hele werelden en objecten simuleren.
raymarching in detail
ik kan het volgende het beste uitleggen in Engels sinds veel termen geen fatsoenlijke Nederlandse vertaling hebben, of een vertaling die heel raar is.
for this we need to first understand the different types of renderers. A renderer simply takes a 3D scene and renders them to a 2D screen. There are multiple types of renderers. one of them is called ray tracing. With ray tracing, you send out one or more rays for every pixel, and then check for intersections with geometry in the scene. This is done recursively to allow for reflections, refractions. Computing these intersections is not cheap though, and since every pixel has to trace so many paths and test intersection so many objects, it's very slow. But, it's more realistic, and the results look amazing. This is why you'll typically see ray tracing used in animated movies, since it can often take hours to render just a few seconds. this method is used in all of the blender projects. The last method I'm going to talk about, is ray marching. Most people have probably never heard of ray marching. It starts off very similar to ray tracing. We have a camera, and we shoot a ray out of every pixel. But this time, we don't compute any expensive intersections. We just march the ray until it hits the object. If the march is too big we'll overshoot, so it needs to be small. But when it's small, it has to march so many times that the algorithm becomes completely inefficient and useless. But suppose, we had a magic formula. This formula tells us how far away we are from the scene at every point in space. We'll call this the Distance Estimator, usually abbreviated as DE. If we knew this, we wouldn't have to march a fixed distance anymore, suppose the distance estimator tells us we're at least five meters away from the scene. Then we know, no matter what, we can safely march five meters in any direction without overshooting. After marching, we check the distance estimator again at the new point. This process repeats, until we're within a tolerance of the object and it converges exponentially as we get closer.
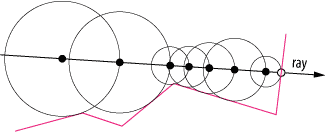
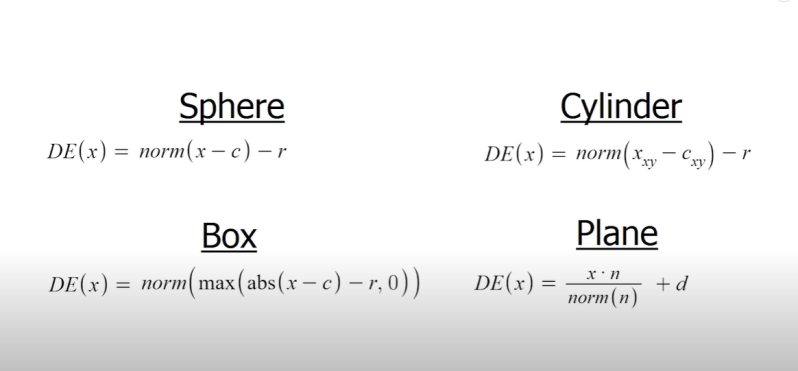
Also, keep in mind that the distance estimator doesn't have to be EXACTLY the distance to the object. It's really only important that it not be MORE than the real distance. But, obviously the better the estimate, the less marches it'll take. And the faster it can render. So, how do we find this magic formula? Well it turns out that the exact formulas are really easy for primitive objects like spheres and cubes. But what about combining objects? Suppose we have two objects in a scene, each with it's own distance estimator. It should make sense that the distance estimator for the entire scene is simply the minimum of the two estimates, since that guarantees you can't overshoot either one. to modify these objects you can alter the formula or change the inputs. a simple type of deformation can be computed with different formulas.
better quality
in addition to objects we need to have to add qualitys to the scene to make it look better. the first thing to add is lighting. with several line sof code the computer can calculate the distance and the direct path to the light source to determine the amount of brightness in this point. the second thing you add is reflections. there are two types of reflections, direct and indirect.
direct reflections act like a mirror they show exactly what is opposite if the normal of the object. the normal is the side and direction the side points to. for squares there are 6 normal and for spheres many.
indirect reflections, reflect light onto the object without showing the reflection in the object.
the third thing we add to the scene is shadows. here we cast light rays and the dark areas remain black or slightly lit. then we round the edges to make softer shadows.
the forth thing is a thing called ambient occlusion. ambient acclusion means that there are more shadows generated without the need of objects directly blocking the light source. think about objects such as creases. they are sometimes to small to create a shadow but are still darker than normal places.
with all of this combined it generates a better looking scene. here is an example of all these combined.

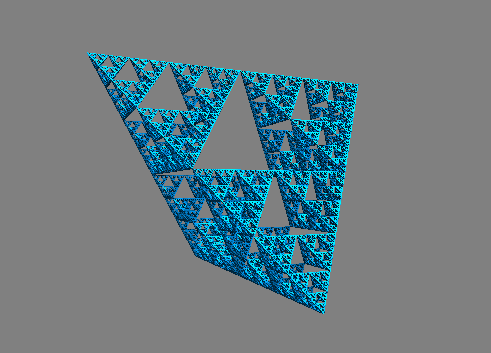
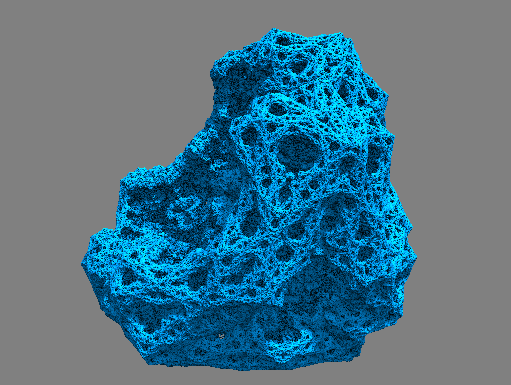
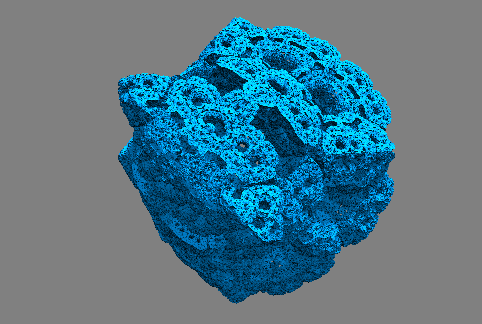
fractals
voor de ingewikkelde vormen gebruik ik een simpele techniek. hierbij pak je een simpel object en kopieer deze en je verplaatst en draait deze vaak achter elkaar. je kan uiteindelijk met veel variabele spelen om verschillende te maken. bijvoorbeeld welke kanten je alles opdraait en hoeveel. ik wou een demo maken die bruikbaar was maar de kwaliteit ging drastisch naar beneden en een grafische kaart is nodig om het programma te gebruiken.
hieronder staan een paar voorbeelden.
Maak jouw eigen website met JouwWeb